Tile Maps
Trial includes a highly efficient way to render tile maps, in the form of the tile-layer. The layer uses the following information:
tilesetA texture that all tiles are stored in that can be rendered.tile-sizeThe square size of each tile in pixels. Defaults to 16.sizeAvec2describing the size of the layer in number of tiles. If unspecified is inferred fromtilemap.tilemapAn octet array of size width*height*2 describing the tiles being rendered. You may also pass a pathname or stream that reads into that same information.
Let us illustrate all of these properties by way of an example. Here's a very simple tile set:
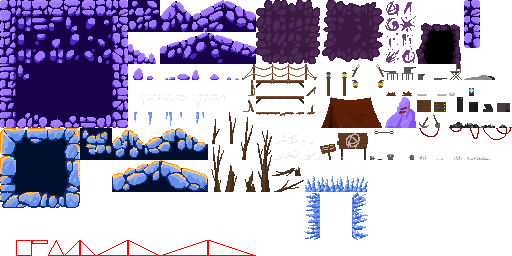
In this tileset, the tile-size is 16.
Here's a corresponding 40x26 tilemap (encoded as a PNG) that makes use of this tileset:

This probably doesn't look like anything to you, so let me modify the image a little bit, converting it from grayscale-alpha to red/green, and upping the contrast:

Each pixel in the image represents the X and Y offsets of the tile in the tileset that should be rendered at that point, counting from the bottom left. So for instance to select that red square tile, the tilemap would contain a pixel with the data 1,0.
Authoring these maps by hand is very tricky as it's so hard to see them. There are two editors you might be able to re-use, at this point. First, the editor provided in Kandria edits these tilemaps, and second the Tiled editor's exported JSON format is partially supported through the tile-data asset.
Regardless, once a map has been created, all you need to do is construct a tile-layer as appropriate:
(define-asset (workbench tileset) image #p"tileset.png")

(make-instance 'tile-layer :tileset (// 'workbench tileset) :size (vec 40 26) :tilemap #p"tilemap.dat")
The class also provides functions to resize the map, and to access individual tiles.
For the tile-data approach, export your map from Tiled as a JSON file and then define your asset and instance as follows:
(define-asset (workbench tilemap) tile-data #p"tilemap.json")

(make-instance 'tile-layer :tile-data (asset 'workbench 'tilemap))
You can also pass the :map-name corresponding to the id field of one of the layers in the json.